Painted rocks serve multiple purposes beyond mere decoration. They can be used as garden ornaments, gifts, or even as part of community art projects. The trend has gained significant traction worldwide, with rock painting groups and events popping up in cities and towns. This growing movement not only promotes artistic expression but also fosters community connections and environmental awareness. The simplicity of materials required – just rocks, paint, and brushes – makes this art form accessible to people of all ages and backgrounds. The benefits of engaging in rock painting extend beyond the artistic realm. This activity has been shown to improve mental well-being, reduce stress, and enhance focus. As you explore various fun painted rock ideas, you'll discover how this simple craft can become a meaningful outlet for creativity and self-discovery. Whether you're looking to create something beautiful for your home or searching for a way to connect with others through art, painted rocks offer a unique and rewarding experience.
Table of Contents
- What Makes Painted Rocks So Popular Today?
- Essential Materials for Creating Stunning Painted Rocks
- How to Choose the Perfect Rock for Painting?
- Mastering Basic Techniques for Beginners
- Exploring Advanced Designs and Patterns
- What Are the Best Fun Painted Rock Ideas for Beginners?
- Joining Local Community Rock Painting Projects
- Can Painted Rocks Be Used for Educational Purposes?
What Makes Painted Rocks So Popular Today?
Painted rocks have captured the imagination of people worldwide for several compelling reasons. The trend's accessibility plays a significant role in its widespread adoption. Unlike many art forms that require expensive materials or specialized equipment, rock painting requires minimal investment. Basic supplies can be purchased for under $20, making it an attractive option for families, schools, and community groups. The portability of rocks also adds to their appeal, allowing artists to work anywhere from their living rooms to outdoor spaces.
Social media platforms have significantly contributed to the popularity of painted rocks. Instagram and Pinterest showcase countless examples of creative designs, inspiring new artists daily. The hashtag #paintedrocks has millions of posts, creating a vibrant online community where enthusiasts share their work and techniques. This digital connection has transformed what was once a solitary activity into a global movement, with rock painters forming local groups and organizing community events.
Read also:Discover The Power Of Hub4u Your Ultimate Digital Resource Hub
The therapeutic benefits of rock painting have also contributed to its mainstream acceptance. Many mental health professionals recommend this activity as a form of art therapy. The repetitive motion of painting, combined with the focus required for detailed work, helps calm the mind and reduce anxiety. Additionally, the satisfaction of completing a small project provides a sense of accomplishment that boosts self-esteem. These psychological benefits, coupled with the social aspect of rock painting communities, have made it a popular choice for people seeking both creative expression and emotional well-being.
Essential Materials for Creating Stunning Painted Rocks
Creating beautiful painted rocks begins with gathering the right materials. The foundation of any successful rock painting project is, unsurprisingly, the rocks themselves. Look for smooth, flat stones that fit comfortably in your hand. River rocks are ideal due to their natural smoothness, but any stone without sharp edges will work. The size should be manageable – typically between 2 to 6 inches in diameter – for easy handling during painting.
When it comes to paint, acrylics are the preferred choice for rock painting. Their quick-drying nature and vibrant colors make them perfect for this medium. Invest in a basic set of primary colors plus white and black, as these can be mixed to create virtually any shade. For detailed work, fine-tip paint pens are invaluable tools. They allow for precise lines and intricate patterns that would be difficult to achieve with traditional brushes alone.
Several additional tools can enhance your rock painting experience. A set of various-sized brushes is essential, ranging from broad flat brushes for base coats to fine detail brushes for intricate work. Sealant is another crucial component – both a clear base coat to prepare the rock surface and a final varnish to protect your artwork. Other helpful supplies include paper plates for paint palettes, water containers for brush cleaning, and paper towels for quick clean-ups. Remember to work in a well-ventilated area and protect your workspace with newspaper or a drop cloth.
How to Choose the Perfect Rock for Painting?
Selecting the right rock is crucial for successful painting. The ideal rock should be smooth and free of cracks or deep crevices that could interfere with paint application. Natural river rocks are often the best choice due to their smooth surfaces, but beach stones or landscaping rocks can work equally well if properly prepared. The rock's shape should complement your intended design – flat surfaces are perfect for detailed scenes, while rounded stones work well for animal or character designs.
Consider the rock's size relative to your skill level and project goals. Beginners might find smaller rocks (2-3 inches) less intimidating, while larger stones (4-6 inches) offer more space for complex designs. The weight of the rock is also important – it should feel substantial in your hand but not so heavy that it becomes difficult to handle during painting. When collecting rocks outdoors, ensure you have permission to take them and always follow local environmental guidelines.
Read also:The Enduring Legacy Of Dr Bell A Resident Icon Who Shaped Generations
Preparation is key to achieving professional-looking results. Once you've selected your rocks, clean them thoroughly with soap and water to remove dirt and debris. Allow them to dry completely before painting. Some artists recommend soaking rocks overnight to ensure all dirt particles are removed. After drying, examine each rock for any remaining rough spots that might need light sanding. This preparation process might seem time-consuming, but it significantly impacts the final quality of your painted rock creations.
Mastering Basic Techniques for Beginners
Preparation Steps for Successful Rock Painting
Before diving into painting, proper preparation ensures your artwork will last. Start by applying a base coat of white or light-colored acrylic paint. This primer creates a smooth surface that helps colors appear more vibrant and prevents the rock's natural color from bleeding through. Allow the base coat to dry completely before proceeding – this might take 15-30 minutes depending on your environment's humidity. Some artists prefer applying two thin coats rather than one thick layer for better coverage.
Once your base coat is ready, sketch your design lightly with a pencil. This preliminary drawing serves as a roadmap for your painting process. For symmetrical designs, consider using a lightbox or tracing paper to transfer your pattern accurately. If you're painting freehand, start with basic shapes and gradually add details. Remember that mistakes can be easily corrected by painting over them once the layer has dried. This flexibility makes rock painting particularly beginner-friendly.
Develop a systematic approach to painting. Begin with larger areas and background colors, working your way to smaller details. This method prevents accidental smudging of fine details. Keep a consistent direction when painting – either left to right or top to bottom – to maintain smooth, even coverage. Use a hairdryer on low heat between layers to speed up drying time, but be careful not to overheat the paint. These preparation steps might seem basic, but they form the foundation of professional-looking results.
Different Painting Methods to Try
Rock painting offers various techniques to explore, each yielding unique results. The dry brush method creates textured effects by using minimal paint on a dry brush. This technique works well for fur, grass, or weathered surfaces. For smooth gradients, try the wet-on-wet approach where you apply paint to a damp surface, allowing colors to blend naturally. Stippling involves dabbing the brush to create patterns of dots, perfect for creating texture or filling large areas.
Stamping techniques can add interesting patterns to your rocks. Use household items like pencil erasers, wine corks, or even leaves as makeshift stamps. Press these items into paint and then onto the rock surface for repetitive patterns. Another popular method is the sponge technique, where you dab paint with a sponge to create soft, cloud-like effects. This works particularly well for backgrounds or creating depth in landscapes.
Experiment with layering techniques to add dimension to your designs. Start with a base color, then add successive layers of different shades to create depth. Use masking tape to create clean lines or geometric patterns. For metallic effects, try mixing metallic paint with regular colors or using metallic markers for highlights. Remember to seal each layer before adding the next to prevent colors from bleeding. These various methods allow you to develop your personal style while mastering different painting techniques.
Exploring Advanced Designs and Patterns
Once you've mastered basic techniques, advanced designs open up a world of creative possibilities. Mandala patterns, with their intricate geometric shapes, have become particularly popular in rock painting. Start with a central point and build outward with repeating patterns, using fine-tip pens for precision work. These designs not only look stunning but also serve as excellent practice for developing steady hand control and patience.
Nature-inspired designs offer endless inspiration for advanced painters. Create realistic landscapes by layering different colors to represent sky, mountains, and foreground elements. Use fine brushes to add details like trees, flowers, or animals. Ocean scenes can be particularly striking, with graduated blues for water and white highlights for waves. Consider adding three-dimensional elements by attaching small shells or beads for texture.
Character designs present another exciting challenge for experienced painters. From cartoon characters to realistic animal portraits, these projects require careful planning and precise execution. Use reference images to capture accurate proportions and details. For character faces, focus on getting the eyes and mouth placement correct, as these features convey most of the expression. Advanced painters can experiment with shading techniques to add depth and realism to their characters. Remember that practice is key – even experienced artists often create several practice pieces before attempting complex designs on rocks.
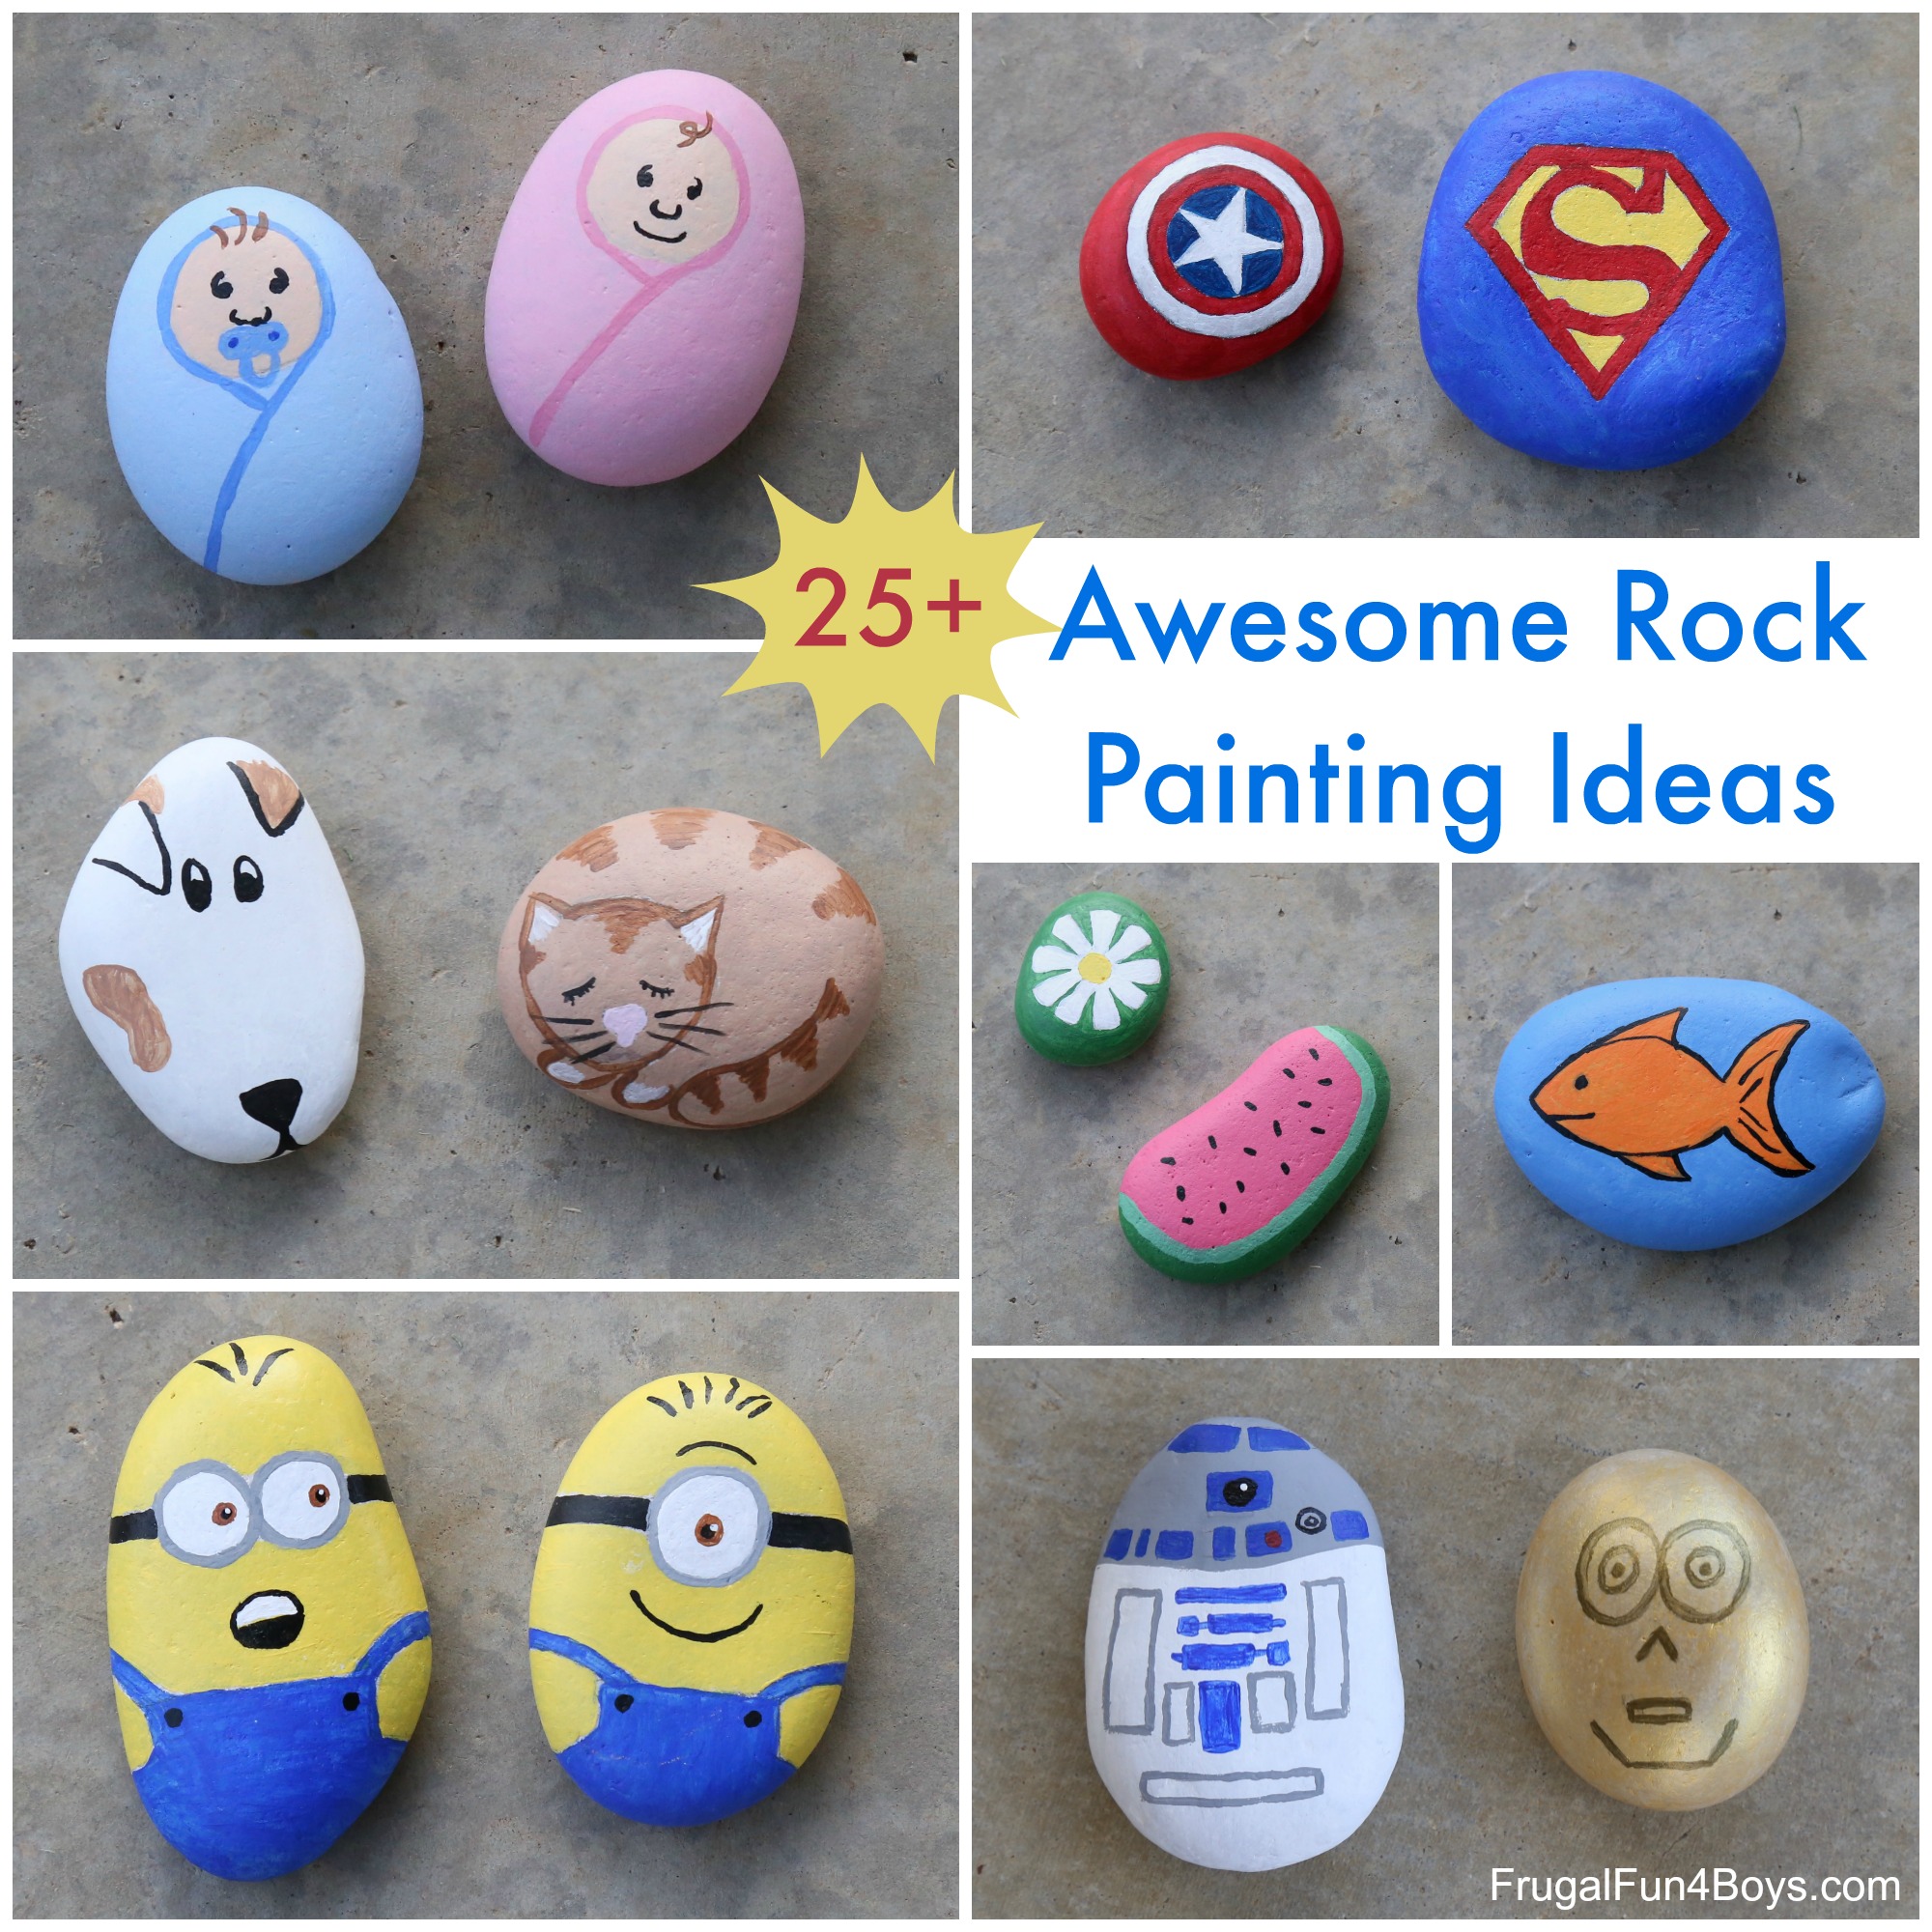
What Are the Best Fun Painted Rock Ideas for Beginners?
Beginners often wonder which designs will yield the most satisfying results without being overwhelming. Simple animal faces rank among the best fun painted rock ideas for newcomers. Start with basic shapes – a circle for the face, smaller circles for eyes, and simple lines for features. Ladybugs, owls, and fish make excellent choices due to their recognizable shapes and minimal details. These designs help build confidence while teaching fundamental painting skills.
Another excellent beginner project involves painting motivational words or phrases. Choose short, powerful words like "Hope," "Love," or "Believe" and practice different lettering styles. These rocks can be placed in gardens or given as gifts, spreading positivity while you hone your skills. For added interest, incorporate simple decorative elements around the words, such as dots, stripes, or small flowers. This approach allows you to practice both lettering and basic design elements simultaneously.
Seasonal themes offer another avenue for beginner-friendly fun painted rock ideas. Paint pumpkins for fall, snowflakes for winter, flowers for spring, or suns for summer. These designs typically involve basic shapes and colors, making them perfect for practice. Consider creating a series of seasonal rocks that can be displayed throughout the year. As your skills improve, you can add more details and complexity to these designs, creating a collection that showcases your progress over time.
Joining Local Community Rock Painting Projects
Community rock painting projects have become a powerful force for bringing people together while beautifying public spaces. These initiatives often start small, with local artists hiding painted rocks in parks or community gardens for others to find. The concept has evolved into organized events where participants gather to paint rocks, share techniques, and distribute their creations throughout the community. Many towns now host regular rock painting workshops and "rock hunts" that attract participants of all ages.
The impact of these community projects extends far beyond simple artistic expression. They serve as social connectors, bringing together people from diverse backgrounds who might not otherwise interact. Schools incorporate rock painting into their curriculum, using it as a tool for teaching art, environmental awareness, and community involvement. Nursing homes and hospitals have embraced these projects as therapeutic activities that promote mental well-being and social interaction among residents and patients.
Several successful community projects demonstrate the power of painted rocks to create positive change. The "Kindness Rocks Project," which began in Massachusetts, has inspired similar initiatives worldwide. Participants paint rocks with encouraging messages and hide them in public spaces, creating a chain reaction of goodwill. Some communities